Here are a few simple page and text formatting “How To” instructions that will help you do some basic things to your text. With these instructions, you'll acquire enough confidence to start trying some additional page and text formatting processes on your own!
It really is easier than you think to work with Word!
Learn a Few Basic Word TermsThis article refers to a few basic terms that are used in most instructions for working with Word. You might not know these, so this should help:
Cursor: After you have opened up a Word document, if you move your mouse around, an arrow (a vertical line that blinks, or some other symbol that you've selected) will move around. This is the cursor. When you move the cursor around a Word document and then click the mouse button, this positions the cursor in that place. When you hit any character on the keyboard, that letter, number, or symbol is put right where the cursor is placed.
Toolbar: There are one or more rows of icons (little symbols) and drop-down windows (white fields that have a word or two or maybe a number in the field and then a little down arrow symbol to the right). These icons and drop-down windows represent all of the things that you can do to “manipulate” (chan ge) your document.
Icon: The symbols, numbers, or letters on the toolbar are icons. Pass the cursor over that icon and a drop down box should appear (this is called a tool tip) that tells you what that icon represents.
 ge) your document.
Icon: The symbols, numbers, or letters on the toolbar are icons. Pass the cursor over that icon and a drop down box should appear (this is called a tool tip) that tells you what that icon represents.
Drop-Down Menu: When you click on the little arrow that is to the right of the field, you will get another menu that “drops down.” To change the selection that appears in the drop-down window, you click on something in that drop-down menu.
Highlight: In order to make a change to text that is already in the Word document, you need to “highlight” that text. To do this, position the cursor right in front of the first letter of the first word of the text/section that you want to change. Holding your mouse button down drag your cursor the word or words you are highlighting. The text will be highlighted (in black). When you release the mouse button, all the text will be highlighted. This is now “highlighted” also called “blocked highlighted”.
1. What's a Font and How Do I Change It? The “font” is the style that is applied to the letters, characters, and symbols that you type. The font that is [usually] automatically selected when you open a new (blank) Word document is Times New Roman.
Find the drop-down window in the toolbar that has “Times New Roman” in the field. Click on the down arrow. A list will appear of all the different styles of fonts that are available on your computer. The name of the font shows its style. If you click on a font, anything new that you type from where the cursor is positioned in your text will show up in the new font.
If you want to change the font of existing text, then highlight everything you want to change. A quick way to highlight all your text is to use the command [Ctrl/A].Then click the down arrow of the font window and click on the font that you want to use. The text that you have highlighted will change to that font.
2. What is Font Size?The font size is how big the letters, numbers, and other symbols are when you type. The default is 12pt. You can change the font size using the same type of process that is explained for changing the font. The higher the font size number, the larger the text size. (9, 10, 11, 12, 14, and so on) 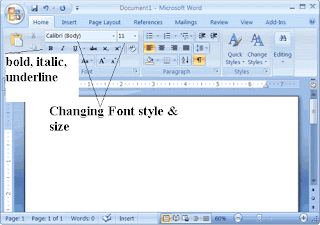
Click the cursor in the Word document, and then change the font size (by clicking on the down arrow for the font size field on your toolbar, select the size you want). Whatever you type now will be in that font size.
To change the font size of existing text, then highlight what you want to change, and select the font size you want. Click on the font size and the highlighted text will change to that size.
3. How Do I Change Text to Bold, Italic, or Underline?
On your toolbar, you should see a darkened capital B, and darkened capital I that is slanted to the right, and a darkened capital U that has a line under it. These icons represent Bold, Italic, and Underline, respectively.
When you click on these icons, everything you type will be either become Bold, Italic, or Underlined. If you click any two icons, or all three icons, then you can type words that are both bold and italic (like this), bold and underlined (like this), italic and underlined (like this), or bold, italic, and underlined (like this).
You can start typing with bold, italic, or underlines or you can change existing text to bold, italic, or underlined as described in changing the font.
4. Putting Page Numbers in a Document
You might need to number the pages of your document. This is very easy. Position the cursor in front of the first word on the first page. On the toolbar, hit the word that says Insert. Now click on Page Numbers.
A pop-up window will appear that will give you some options for putting page numbers in your document. The best way to learn what each of these options will do is simply to click on the down arrow for the fields or click the buttons that are at the bottom of the pop-up window. When you have selected the options you want, click OK in that pop-up window. That window will close, and your document will be page-numbered in the manner you have selected.
5. What is a Page Break and What Does It Do?In the old days of typewriters and typewrite paper, when you wanted to start a “new page,” then you took the paper out of the typewriter and put in a new piece.
Today, in a computerized Word document, when you want to start a “new page,” then you need to insert a “page break.”
On the toolbar, click on Insert. Click on Page Breaks. The first selection, Page Break, should be selected (a black dot is in the circle in front of Page Break). When you click on OK, a page break will be inserted wherever the cursor is positioned in your document. You will see a dotted line from the left margin to the right margin, and the words Page Break in the middle. Even though it might not look like it on your computer screen, when you print the document, the printer will start printing on another page when it hits an inserted Page Break.
What Else Can I Do to Change the Formatting of a Word Document?
You can change everything from the margins (left, right, top, and bottom) to inserting fancy tables into any given page of your text. By using the confidence you've gained in doing just these few simple things, start to click on icons and choose selections in drop-down windows to experiment with all the features that Word offers.
I promise you that for each new “trick” you learn, there will be an endless number of more features left to learn!
Come join us learn the ins and out of Introduction to WORD class held each month in the Visalia Branch Computer Lab.
No comments:
Post a Comment