DO YOU KNOW HOW TO . . . . . . .?

Friday, April 22, 2011

Electronic Mail - E mail

Top 7 Ways to Help Make Sure Your E-Mail Gets Read

Help prevent your electronic mail from getting automatically tossed into spam folders.

E-mail is an extremely important tool that helps friends, family members, and coworkers communicate, the rampant spread of unsolicited commercial e-mail has made this communication medium less useful. Depending on which security researcher you believe, spam now accounts for 85-95% of all e-mail traffic on the Internet.
Due to so much junk clogging our inboxes, more users, e-mail software programmers, and Internet and e-mail providers have become extremely aggressive in using filters to help trap spam. While good filters can prevent a large chunk of spam from entering e-mailboxes, they may also trap legitimate commercial and non-commercial e-mail as well.
Especially if you perform valid business via e-mail, but even if you just send a few jokes to coworkers, it has become increasingly important to work harder to help ensure your valid messages do not get caught in spam filters. Below are seven tactics you can use to help keep this from happening.

1. Use a subject line- it sounds so simple but I'm surprised how often this gets ignored. If I see an e-mail with no subject in my Inbox and I don't immediately (and I mean IMMEDIATELY) recognize the sender, more than likely it gets trashed. Some filters will do the same automatically.

2. Describe your Subject. Don't just send an e-mail with the word "hi" or "read me" as the subject line. Think of a newspaper - if you don't see catchy headlines, more than likely you won't read the stories. The more descriptive the subject line, the more likely someone (or some filter) won't immediately pass the e-mail off as spam. Just don't get too carried away and post multi-line subjects, either, as this also may steer people away from your e-mails.
3. DO NOT TYPE IN ALL CAPS! Neither in the subject line (yes, I'm harping on the subject line a lot!) or in the body of the e-mail message. Some consider it rude, others amateurish. You probably don't want to type in all lower-case either, but at least that looks slightly better. Please learn how to use the SHIFT key. Not only will many spam filters mark such e-mails as questionable, many people may refuse to read them even if they pass through filters.
4. Avoid certain topics in the subject line that spammers often use. Many spam filters target e-mail with subjects such as: * aging* and more* dear friend* free* guarantee* important* lottery* mortgage* pill* property* rates* urgent
5. Stop sending file attachments in every e-mail. There are some good reasons:
Some office-based e-mail filters will trap ALL attachments or just attachments of several questionable file types. Depending on the filter, only the attachments may be removed, or entire e-mails may get squashed. If you send e-mails containing attachments, potential recipients may not only miss your attachments but the text inside the e-mails as well.
Even though you may have a cable, DSL, satellite, T1, or other high-speed connection to the Internet, many people are getting along just fine with a dial-up connection. At least they are until you send them a 2 megabyte photo of a family picnic that they weren't expecting.

Summary:
With the rise of spam e-mail filters comes the increased chance that your legitimate e-mails may get blocked. Help prevent this from happening by using smart, descriptive subject lines, avoiding 'gotcha' words such as 'free'. DO NOT TYPE IN ALL CAPS. Avoid file attachments unless your recipients know they are coming. Don't be 'that person' who always sends out the new joke. While nothing guarantees your e-mail will get read, even if it arrives at its destination, following this advice at least increases the chance your messages will not get routed to the "spam" folder.

Basic Internet Hints and Tips

Internet Searching Tips

Knowing that the information "exists" on the internet is just your first step. Finding useful, credible information is an art and a science. You will want to spend some time learning how to search for the information you want and how to weed out the extraneous, useless information you don't want.

If you are familiar with looking up information in the nearly obsolete library card catalog, using the internet will basically be an extension of the skills you already have:

  • Determining Keywords
  • Using Indexes
  • Following through to find useful articles and information
Determining Keywords
Whether you are looking for college information or researching for a job, it is helpful to first make a list of words and phrases that relate to your subject. Be creative. Let your mind wander, use a thesaurus, put it down and come back later. Then, pick out a few of the most descriptive phrases to start with.
As an example, the following are a few we came up with when looking for adult college student information:
adult college student, adult learner, re-entry student, returning student, distance learning, continuing education, college student, student orientation, campus counseling center, career change, study, student success, college funding, financial aid, grants, scholarships.
Once you start searching, your results will lead you toward other keywords that may help you hone in on your specific topic.
NOTE: In addition to advanced searching options, most of the searching sites below use "Boolean" search construction, meaning that you can use a + to force a term inclusion, a – to not return pages with a certain term or phrase, and "your phrase in here" within quote marks to force two or more words to be searched on as a phrase.
Each search engine and index runs a little differently. For multiple term searches, one engine might return better results if a + sign is used between terms rather than an &. Another one might have a different form altogether for an "advanced" search. Regardless, the individual sites are the most reliable place to get help and information about using that site's engine.
Some popular search engines and indexes are:
AltaVista.com
Ask.com
Dogpile.com
Excite.com
Google.com
Lycos.com
MSN.com.
Yahoo.com.
Following Through
OK, so you typed in a search term or two and got thousands of listings of results! How are you ever going to find that specific morsel of information you are after??? Here are some pointers:
  • If your result is too broad and you get a bunch of irrelevant results, type in more key words. If you get zero results, type in fewer key words. Many search engines will allow you to use quotes (to search for a phrase) or a minus sign (to disallow certain words or phrases) to hone in on your subject. Additionally, look for an "Advanced Search" option.
  • Narrow the search geographically. Add your city and state name or just state name as one of your searching terms if what you’re looking for is best found locally. Add whatever geographic region might have good information, such as searching for "aboriginal art" could give all sorts of results, "aboriginal art Australia" might get your more on the road toward finding more content laden information as the Aboriginal people are a sizable part of the Australian culture.
  • Read the title and description of the web site listed on the results page. Well constructed sites (which may or may not relate to information credibility) will have a concise, readable title and description of their site.
    Be aware that some web sites pay for listing results. On the larger search sites, these are usually separated out. On other sites, they will be indistinguishable from unpaid listings.
  • Look at the website address. If you are looking for a specific college, product, manufacturer, store, organization, etc., chances are, they probably have registered their own domain name and by becoming familiar with the anatomy of a web address (see the terms web address, directory, domain, sub domain in the glossary), you can fairly easily and reliably predict whether or not you've gotten a "score" on your search.
Educational and Government sites often provide good, free, usable information. Look to sites with domain names that end in ".edu" or ".gov" as generally reliable sources. Next in line might be ".org" sites which for the most part are non-profit organizations, and depending on your slant, may or may not provide you with the information you’re looking for. I've had good luck searching Google on specific phrases or sentences from a page, if you can remember.
  • Open the link in a new tab or window. This way, you can go back to the search results page at will, and only bookmark the most useful sites. To do this, right click or control clicks your mouse to bring up a menu of window options.
  • Bookmark your hottest prospects. By adding the site to your Favorites or Bookmark list, you can visit it later, and more importantly, return to it if you need to find bibliographical information. (Tip: make sure you learn how to edit your bookmarks or favorites, organize your useful links, and delete old or broken links. Otherwise you will get a long list of cryptic bookmarks).
Searching Tips

  1. Use the "back" button on your browser, or alternately, the "History" or "Go" menus. The "back" button will take you to the last page you visited. This will come in handy if you performed a search on a search engine and want to get back to the list of returned sites without having to type in the search again.
  2. Use a multi-search engine to start: http://www.dogpile.com/, http://www.about.com/, http://www.go2net.com/ or similar are good ones to try. They will search a number of other search engines for their top matches. You may get duplicate listings, but you'll get a feel for which engine is providing you with the best matches for your query. If you want more listings from any one search engine, you can then visit the ones that have the most relevant data.
  3. Browse the search engine's directory: Most search engines not only allow you to search the web for your term, but have already categorized listings of sites related to your question. Check the "Education" category on Yahoo.com, for example.
  4. Explore the sites you visit. If you find a single page article that has useful information on it, take the time to explore what else the site offers.
  5. Use the site's built-in search engine. Many sites incorporate their own on-site search engine. These are very useful for finding the specific information you might be after. Use your browser's "find" command to search for a term on the page you're browsing. This is useful on a page with a lot of content.

Common web surfing errors
  • Server busy error: This usually indicates that the server (a computer "hosting" the file or site) you want is either temporarily not functioning, overloaded, or the pathway to the server is obstructed somehow. Try to access the site at a later time.
  • A Connection Failure Has Occurred: Similar to Server Busy Error. Try to access the site at a later time.
  • Unable to locate a server: This usually means that the server is no longer in service, which you made a typing error, or the address wasn't quite right. Sometimes, though, the big routing servers go down and computers from a certain region may not be able to "find" the address you want to go to. Try again later or check whether the domain name (server name) is valid. Do this by visiting http://www.networksolutions.com/cgi-bin/whois/whois for a "who is" searching gateway. You can type in the domain name and it will return a screen that tells you if and to whom the domain name has been registered.
  • "404 File not found" error when trying to access a site means that the server is working, but that the specific file is no longer available. Sometimes the owner of the file has changed services or reconstructed the site. If the owner has moved, you will have to search the title of the file on a search engine. If the site has been reorganized, you may be able to find the file you want by back-stepping the cursor in the address line deleting the characters back to a "/" mark and hitting "enter" again. Keep doing this until you get to a spot where a real page is displayed and look for the file you want.
For example, the file you want is at http://www.domain.com/first_directory/next_directory/filename.html and it doesn't come up. Delete the "filename.html" so that the "/" is the last character (http://www.domain.com/first_directory/next_directory/) and hit enter again. You might get another 404 error, a "forbidden message," or if you're lucky, you'll get an index listing of what's in that directory and you can see if the file you are after is there.
  • "No Such Device or Address" This error generally means there is something wrong with your connection. Maybe the phone line came unplugged, or someone in the house picked up the other handset for just second. Best way to solve is to disconnect and reconnect to the internet. This may involve a computer restart. Sometimes, the problem can be on the service provider's end, but not too often.

Working with word...it's easier than you think!

You've managed to open a blank document in Word and you've written some text. You've even managed to save it to you computer---and you can even find that file again and re-open it. But now, you have no clue how to do some of the basic formatting that you might need to do in order to get the document into the page format that is required by your teacher, professor, friend, etc.
Here are a few simple page and text formatting “How To” instructions that will help you do some basic things to your text. With these instructions, you'll acquire enough confidence to start trying some additional page and text formatting processes on your own!


It really is easier than you think to work with Word!

Learn a Few Basic Word TermsThis article refers to a few basic terms that are used in most instructions for working with Word. You might not know these, so this should help:

Cursor: After you have opened up a Word document, if you move your mouse around, an arrow (a vertical line that blinks, or some other symbol that you've selected) will move around. This is the cursor. When you move the cursor around a Word document and then click the mouse button, this positions the cursor in that place. When you hit any character on the keyboard, that letter, number, or symbol is put right where the cursor is placed.
Toolbar: There are one or more rows of icons (little symbols) and drop-down windows (white fields that have a word or two or maybe a number in the field and then a little down arrow symbol to the right). These icons and drop-down windows represent all of the things that you can do to “manipulate” (change) your document.
Icon: The symbols, numbers, or letters on the toolbar are icons. Pass the cursor over that icon and a drop down box should appear (this is called a tool tip) that tells you what that icon represents.

Drop-Down Menu: When you click on the little arrow that is to the right of the field, you will get another menu that “drops down.” To change the selection that appears in the drop-down window, you click on something in that drop-down menu.

Highlight: In order to make a change to text that is already in the Word document, you need to “highlight” that text. To do this, position the cursor right in front of the first letter of the first word of the text/section that you want to change. Holding your mouse button down drag your cursor the word or words you are highlighting. The text will be highlighted (in black). When you release the mouse button, all the text will be highlighted. This is now “highlighted” also called “blocked highlighted”.
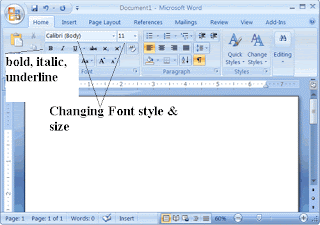
1. What's a Font and How Do I Change It? The “font” is the style that is applied to the letters, characters, and symbols that you type. The font that is [usually] automatically selected when you open a new (blank) Word document is Times New Roman.
Find the drop-down window in the toolbar that has “Times New Roman” in the field. Click on the down arrow. A list will appear of all the different styles of fonts that are available on your computer. The name of the font shows its style. If you click on a font, anything new that you type from where the cursor is positioned in your text will show up in the new font.
If you want to change the font of existing text, then highlight everything you want to change. A quick way to highlight all your text is to use the command [Ctrl/A].Then click the down arrow of the font window and click on the font that you want to use. The text that you have highlighted will change to that font.


2. What is Font Size?The font size is how big the letters, numbers, and other symbols are when you type. The default is 12pt. You can change the font size using the same type of process that is explained for changing the font. The higher the font size number, the larger the text size. (9, 10, 11, 12, 14, and so on)
Click the cursor in the Word document, and then change the font size (by clicking on the down arrow for the font size field on your toolbar, select the size you want). Whatever you type now will be in that font size.
To change the font size of existing text, then highlight what you want to change, and select the font size you want. Click on the font size and the highlighted text will change to that size.


3. How Do I Change Text to Bold, Italic, or Underline?
On your toolbar, you should see a darkened capital B, and darkened capital I that is slanted to the right, and a darkened capital U that has a line under it. These icons represent Bold, Italic, and Underline, respectively.
When you click on these icons, everything you type will be either become Bold, Italic, or Underlined. If you click any two icons, or all three icons, then you can type words that are both bold and italic (like this), bold and underlined (like this), italic and underlined (like this), or bold, italic, and underlined (like this).
You can start typing with bold, italic, or underlines or you can change existing text to bold, italic, or underlined as described in changing the font.

4. Putting Page Numbers in a Document
You might need to number the pages of your document. This is very easy. Position the cursor in front of the first word on the first page. On the toolbar, hit the word that says Insert. Now click on Page Numbers.
A pop-up window will appear that will give you some options for putting page numbers in your document. The best way to learn what each of these options will do is simply to click on the down arrow for the fields or click the buttons that are at the bottom of the pop-up window. When you have selected the options you want, click OK in that pop-up window. That window will close, and your document will be page-numbered in the manner you have selected.

5. What is a Page Break and What Does It Do?In the old days of typewriters and typewrite paper, when you wanted to start a “new page,” then you took the paper out of the typewriter and put in a new piece.
Today, in a computerized Word document, when you want to start a “new page,” then you need to insert a “page break.”
On the toolbar, click on Insert. Click on Page Breaks. The first selection, Page Break, should be selected (a black dot is in the circle in front of Page Break). When you click on OK, a page break will be inserted wherever the cursor is positioned in your document. You will see a dotted line from the left margin to the right margin, and the words Page Break in the middle. Even though it might not look like it on your computer screen, when you print the document, the printer will start printing on another page when it hits an inserted Page Break.


What Else Can I Do to Change the Formatting of a Word Document?
You can change everything from the margins (left, right, top, and bottom) to inserting fancy tables into any given page of your text. By using the confidence you've gained in doing just these few simple things, start to click on icons and choose selections in drop-down windows to experiment with all the features that Word offers.
I promise you that for each new “trick” you learn, there will be an endless number of more features left to learn!

Come join us learn the ins and out of Introduction to WORD class held each month in the Visalia Branch Computer Lab.

Writing Your Resume: Getting Started


This article is written for those who are applying for jobs for the first time, or who are re-entering the work force after having not worked for some period of time. Writing a good resume is easy to do, even if you don't have much work experience or extensive education---all you need are a few tips, some suggestions, and the basic format for a resume and a cover letter. This article will provide all of that, including resume template and a sample cover letter that you can alter to suit your situation.

All word processing applications have a resume wizard and cover letter on the computer.


Resume
There are four essential elements of a resume:
· Your name and address
· Personal Objective
· Work History
· Education


Offering personal references is not essential, but it is a good idea to either list the names and addresses of two or three people or to have that information available if a prospective employer asks for references. More about references is listed below.

Your Name and AddressBe sure to include your full name (no nicknames) and current address. If you are living in shared housing (such as with a parent, a roommate, or in any other shared housing situation), be sure to include a room number or any other information that is part of your full address. Use the complete street name, including the word Avenue, Road, Street, etc. Make sure that you include your zip code.
Your name and address need to appear on the first page of your resume. If your resume is two pages, then be sure that at least your name is on the second page. (Resumes that are longer than two pages might not get processed! Remember that a prospective employer is likely to be reviewing quite a few resumes, so keep your information to the point, and limit yourself to two pages. Tips for keeping your resume crisp and short are listed below.)

Personal ObjectiveInclude a one-sentence statement that provides your "objective" for applying for the job. This doesn't have to be anything more than your honest reason for looking for work. Try to use your own words (that is, try to write the sentence yourself, rather than copying a statement from an example resume). Use plain language (you won't necessarily impress an employer by using big words).
Examples of a personal objective:
  • I am planning on making a career in retail sales, and want to learn more about working in a clothing store.
  • I am very artistic and will enjoy working in a craft store.
  • I am certified in welding and I am looking for a job in a welding shop.
  • I want to contribute my skills as [an XYZ] to a successful company.
As you can see, the "personal objective" statement is a simple sentence that tells the employer why you are applying for the job.

Work HistoryYour work history is a list of your last three jobs; with your most recent job first. If you are currently working, then start with that job. Include the name of the company, address, and phone number. For past employment, list at least the company name, city and state (phone numbers are a plus, even if out-of-state).
Show, in a short list, your primary job duties (tasks) at each job. You don't need to go into a lot of detail. List only the primary tasks for your job position. Don't list job duties that don't pertain that your primary job, unless it is a skill that is applicable to the job you are applying for.
For example, let's say that you are working as a cashier at a local discount store. Your primary tasks are to check out customers and balance your cash drawer. These are the tasks that pertain to your primary job and need to be listed in your resume.
However, let's also say that you are currently applying for a job at another retail store that is hiring a shift leader to work at the checkout station and to help cashiers who have questions or may need help with situations like price overrides. Now and then at your old job, you have been asked to train new cashiers or help other cashiers when they have questions. Since you do have some experience in assisting cashiers, you will want to add that you "also trained and assisted other cashiers" as a job duty because this experience directly applies to the job you are applying for. It shows that you were asked to perform job tasks that weren't part of your primary job and is an indication that the employer trusted you with these types of tasks.
Do this for your two prior jobs. If you've only had one job, then obviously, only list that job. For two jobs, then you'll have only two.

EducationFor most folks, this is going to be relatively simple. List college education (college name, degree earned, and year degree was awarded) and then high school (high school name and year graduated).
If you have only some college credits, then only list if pertinent for the job you are applying for. That is, don't list World History 101 if you are applying for a job as a cashier. However, if you have taken Principles of Management, and you are applying for a job as a shift leader or floor supervisor, then this is education that pertains to the job.
For people who have earned a GED or other vocational certificates, list those. Provide the educational facility that you attended and the year you received the GED or certificate.
If you have copies of degrees, certificates, or other educational awards, then take them with you to the interview. Do not attach them to your resume unless the job application specifically requests them. However, be sure to take copies with you for your job interview, and offer them to the interviewer.
There is no need to provide addresses or phone numbers of the schools. However, if you have this information, be sure to take it with you to the interview.

References
(optional)References are people who may be contacted by a prospective employer and asked to provide work-related or personal information about you. Be sure to verify that your references are willing to be contacted and will be comfortable in answering a few questions about you. Use each person's full name and current telephone number (even if out-of-state).
It is in your best interests to let your references know that you have applied for a job and have given their names as references. Let them know the jobs you have applied for and the company names. That way, your references won't be taken by surprise if they are called. If your references are contacted and provide the information asked for, it is also polite to send a Thank you note (especially if they've helped to get you the job!).
If you have written references (from prior employers, teachers, or friends), be sure to take copies with you to the job interview. That way, you can offer your interviewer a copy that can be kept with your job application (and you won't inconvenience the interviewer by having to make a copy of an original during the interview).
Congratulations! You've now written your resume!

Cover Letter
The cover letter, which is a one-page letter of self-introduction, is also just as easy to prepare. The letter should be brief, no more than three paragraphs of two or three sentences each, and should state your intention for applying for the job and reasons that you are a good candidate for that job.
A cover letter isn't really necessary, but it is a nice touch. For both the resume and the cover letter, never try to sound like anyone other than YOU. Remember, you are the person who will be in the interview. You will be talking. You will be answering questions. If you have your sister-in-law or your next-door neighbor write your cover letter and resume in his or her own language, then the interviewer will be expecting to talk to an applicant who speaks the same way. If you need help, then of course ask for help---but write the resume and the cover letter yourself.
If you don't have access to a computer, a word processor, or a plain old typewriter, then please find someone who does. You should print your cover letter and resume on plain-colored 8-1/2 x 11" paper (white, off-white, or perhaps a soft tan or stone color). It is best to avoid putting your cover letter or resume in any type of binder or folder. Make sure that the prospective employer can access your information easily and without any fuss (resumes in fancy binders, folders, or "envelope in an envelope" may looks nice to you, but to the person who is sorting through 40 resumes, it is just a "pain" and will likely be put on the bottom of the pile).
Be honest. Be confident. Be yourself.
...and I hope you get the job!

Using the Resume Wizard

If you have an Internet connection, you can choose from dozens of resume templates on the Microsoft Office Online Web site. Or, you can create your own resume by using the wizard.
Using a template from Office Online
1. On the File menu, click New.
2. In the New Document
task pane (task pane: A window within an Office program that provides commonly used commands. Its location and small size allow you to use these commands while still working on your files.), under Templates, click Templates on Office Online, and then search for resume.
Using the wizard
1. On the File menu, click New.
2. In the New Document
task pane (task pane: A window within an Office program that provides commonly used commands. Its location and small size allow you to use these commands while still working on your files.), under Templates, click on My computer.
3. Click the Other Documents tab.
4. Double-click Resume Wizard.

Searching is more than just Yahoo and Google

The internet is full of search engines. Searching is not limited to just Yahoo and Google. There are many others that can fill your specific needs. Depending on what you are searching, it is advisable to use a search engine that will give you the best results. You can choose from web search engines, selection-based engines and metasearch engines.

The following is just a sample of what is available to you:

Bing is Microsoft's search engine, formerly Windows Live Search and MSN Search, bing offers Web search and image search as well as videos, shopping, news, maps.

Dogpile fetches and ranks results from multiple search engines, letting you search for key words, pictures, audio, video, news, or phone numbers from a single page.

AltaVista provides web and newsgroup search engines, as well as paid submission services.

HotBot Search engine that offers custom filters, skins, and access various other engines.

AllTheWeb Search engine which indexes web pages, as well as multimedia, audio, FTP, PDF, and MS Word files from around the world.

Lycos the online destination site combining elements of navigation, community, and commerce.

The Ask.com search engine allows users to find online information by asking a question, entering a phrase, or giving a key word. Formerly Ask Jeeves.

Excite provides search, news, email, personals, portfolio tracking, and other services.

Find.com Search engine and subject directory helps users find friends, people, businesses and websites; expert directory on topics for business and pleasure.

PeekYou Search engine that helps other people find your web sites, social networking pages, photos, or anything else about you online.

How do I save saving using a Memory Stick?


How to Use a Memory Stick (in Windows XP)
This is a simple and Easy to use step-by-step guide on how to use a memory stick.


Introduction
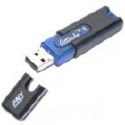
Memory Sticks, or Flash Disks, or Flash Drives, all refer to the same thing, it is simply a different name. Memory Sticks are the new way to save files; they are safer, faster, stronger, tougher, and larger, than floppy disks. We would recommend that if you are thinking of transferring any files to your home PC, use a memory stick. The following guide is to help setting up and using your memory stick.


Setting Up
1. Before you Start
Detach memory stick cap / Extend tab, whichever is appropriate.
3. Insert Memory Stick
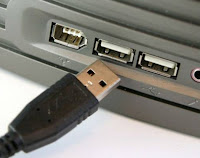
Now the Memory stick can be inserted into your PC.
It must be inserted into an empty USB port, like this located usually on the front of the PC
To insert simply ensure the stick is the right way up and push memory stick into slot until it stops, If you cannot insert the stick turn it around horizontally and try again.
4. Windows Checking
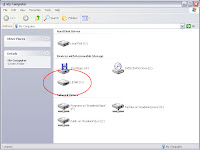
The PC you are using should then recognize that a memory stick has been inserted and will display several boxes informing you that it has recognized your memory stick or installing new hardware.
These will disappear after a few moments so don't worry, just wait and let the computer recognize the new device. The computer should then add an extra Drive to your 'My Computer'. This is usually labeled as removable disk or traveldrive and it can be any letter not taken up by any other drive. To get to 'My Computer', starting from the Desktop simply double click on the 'My Computer' icon, and the window will appear And there you have it, the new drive can now be accessed and used the same as any other drive, the (C:) hard disk or (A:) floppy disk.

To Save or Open your workDepending on what type of program you are using will depend on what you have to do to save your work.
If you are at home and using your memory stick you should be able to save and open files straight to the memory stick from within most programs. Simply save files by going to 'File' then 'Save As', then changing the Save in: box to the memory stick, which can be selected from the drop down list, and then click Save. Similarly click on File Open to open the file.


How to Copy Files to your memory stick
Open up your 'My Documents' (or wherever the documents are saved)
Select the files you wish to copy, (to select multiple files hold down Ctrl and select another file).
Then Click on Edit, then Copy.
Then Navigate to your F: Drive by opening up, My Computer and going to the (F:) drive
Then click on Edit, Paste, and the files you selected should then be copied onto your Memory Stick.


Removing Memory StickOnce you have finished your work you must do the following before removing your memory stick, failure to follow this procedure may make your memory stick unusable or cause you to lose files saved recently.
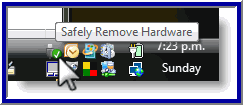
Left Click on the Removable Hardware Icon(green arrow on task bar) in the right hand corner of the screen.
Select, and then click the option, Stop USB Device (F:)
Now you can remove your memory stick from the machine.


Care of USB Memory Sticks

Avoid contact with extreme heat, cold, magnetic fields and liquids. All memory sticks come with a cap to protect the electrical contacts - Use it!Take care not to leave your memory stick in a PC. Label your memory stick so it's easily recognizable as yours. Memory sticks are cheap and easy to replace, your data may not be! Have you got a backup? Ensure that you remove the memory stick in the correct way by stopping it first.

Find and Replace Text

In Word, you can search a document and replace with other text. The searching and replacing processes are explained below:


The process of searching or finding a specified text in the document is called finding text. In Microsoft Word, it is performed with the "Find" command. To apply the "Find" command in Microsoft Word, choose one of the following.

  • Select Find command from Home tab, or press Ctrl+F shortcut key.
  • Enter the text you want to search in the document. It may consist of single character, word, punctuation marks, special characters etc.
  • Click Find Next button of dialog box to search the given text. If the specified text is found, it appears in the document as selected/highlighted. The Find and Replace dialog box again appears. Click Find Next button of dialog box to search for the next occurrence of the text in the document.
  • Click Cancel button of dialog box to stop the search process.

The process of finding text in the current document and replacing it with another one is called Replacing Text. In Microsoft Word, it is performed with Replace command. To apply Replace command in Microsoft Word, choose one of the following.
  • Select Replace command from Home tab, or Press Ctrl+H shortcut key.
  • In the Find box enter the text you want to search.
  • In the Replace box enter the text you want to replace it with.
  • Click Replace button to replace each occurrence one by one. In case you want to skip an occurrence click the Find Next button to jump to the next occurrence or you can Replace All. This will replace ALL the selected words in the document.

Followers